Pumpkin Oreo Balls – Easy Fall Dessert Treat
Pumpkin Oreo Balls are the ultimate autumnal indulgence, a treat that perfectly captures the cozy flavors of fall in every delightful bite. If you’ve ever found yourself dreaming of crisp air, vibrant leaves, and the comforting scent of pumpkin spice, then get ready, because these no-bake wonders are about to become your new obsession. We all adore the classic Oreo ball, that irresistible combination of crushed cookies and cream cheese, but introducing the warm, spicy essence of pumpkin transforms it into something truly magical. What makes these Pumpkin Oreo Balls so incredibly special is their ability to deliver a powerful punch of seasonal cheer without any baking required. It’s a simple, yet utterly satisfying way to bring a touch of gourmet festivity to any gathering, or even just a quiet afternoon craving. Trust me, one bite and you’ll understand why everyone raves about this perfectly spiced delight!

Pumpkin Oreo Balls
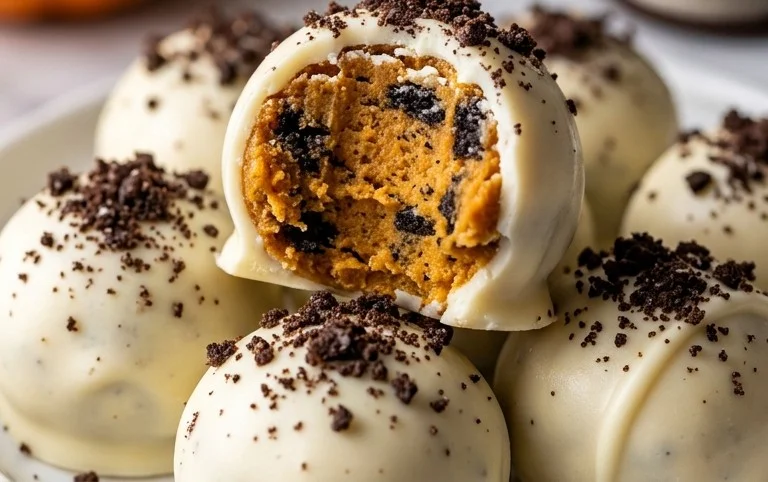
There’s something magical about the fall season, and for me, it always involves delicious treats. If you’re like me and adore the combination of pumpkin spice and chocolate, then these Pumpkin Oreo Balls are an absolute must-try. They are incredibly easy to make, require no baking, and are always a huge hit at parties, gatherings, or just for a cozy night in. The vibrant orange color from the candy melts makes them festive, and the creamy pumpkin-spiced center is simply divine. Get ready to impress your friends and family with these delightful no-bake wonders!
Ingredients:
Getting Started: Preparing the Base
The foundation of our Pumpkin Oreo Balls is the classic Oreo cookie. We’re going to transform these beloved cookies into a rich, crumbly base that perfectly complements the creamy center. The key to getting a wonderfully smooth texture is to crush the Oreos very finely. You can achieve this by using a food processor, which is the easiest and fastest method. Simply pulse the cookies until they resemble fine crumbs. If you don’t have a food processor, don’t worry! You can also place the Oreo cookies in a large zip-top bag, seal it tightly, and then use a rolling pin to crush them into fine crumbs. Make sure there are no large chunks remaining, as this can affect the texture of the final treat. Once you have your finely crushed Oreo crumbs, transfer them to a medium-sized mixing bowl.
Combining with Cream Cheese
Next, we’ll introduce the cream cheese, which will bind the Oreo crumbs together and create that irresistible, chewy texture. Ensure your cream cheese is fully softened. This is crucial because it will allow for easier incorporation and prevent lumps. You can soften cream cheese by leaving it at room temperature for about an hour, or if you’re short on time, you can carefully microwave it in short bursts (15-20 seconds at a time) until it’s pliable but not melted. Add the softened cream cheese to the bowl with the Oreo crumbs. Using a sturdy spatula or your hands (clean hands work best for this stage!), mix the cream cheese and Oreo crumbs together thoroughly. You want to combine them until there are no visible streaks of cream cheese and the mixture holds together when pressed. It should form a cohesive dough-like consistency. If you’re adding a pinch of pumpkin pie spice for an extra flavor boost, now is the time to gently mix it in with the cream cheese and crumbs.
Forming the Balls
Now comes the fun part: shaping our delicious mixture into balls! This is where you can get your hands a little messy, but it’s all part of the process. Take small portions of the Oreo and cream cheese mixture and roll them between your palms to form uniform balls. Aim for a size that’s easy to handle and dip, about 1 inch in diameter. You can use a tablespoon as a guide for consistent sizing. If the mixture feels too sticky, you can lightly dust your hands with a tiny bit of extra Oreo crumbs. Place the formed balls onto a baking sheet lined with parchment paper. Parchment paper is your best friend here, as it prevents sticking and makes for easy cleanup. Once all the mixture is rolled into balls, place the baking sheet into the refrigerator for at least 30 minutes. This chilling step is very important as it will firm up the balls, making them much easier to dip into the melted candy.
Melting the Candy Melts
While our Oreo balls are chilling, let’s prepare the coating. We’ll be using orange candy melts for that festive pumpkin hue. There are a couple of ways to melt candy melts effectively. The easiest method is in the microwave. Place the orange candy melts in a microwave-safe bowl. Microwave on 50% power for 30-second intervals, stirring well after each interval, until the candy melts are completely smooth and creamy. Be careful not to overheat them, as this can cause them to seize or become lumpy. Alternatively, you can melt them using a double boiler. Place the candy melts in a heatproof bowl set over a pot of simmering water, ensuring the bottom of the bowl doesn’t touch the water. Stir constantly until the candy melts are fully melted and smooth. Once melted, stir in a teaspoon of vegetable oil or coconut oil if the melts seem too thick. This will help achieve a smoother coating consistency.
Dipping and Decorating
This is the grand finale! Carefully remove the chilled Oreo balls from the refrigerator. Dip each chilled ball into the melted orange candy melts, using a fork or a toothpick to help coat them completely. Let any excess coating drip back into the bowl. Gently place the dipped Oreo ball back onto the parchment-lined baking sheet. If you’re adding sprinkles, now is the perfect time to do so while the candy coating is still wet. Get creative with fall-themed sprinkles, or even drizzle with a contrasting color of melted candy for an extra decorative touch. Allow the candy coating to set completely. This can take about 15-20 minutes at room temperature, or you can speed up the process by placing the baking sheet back in the refrigerator for about 10-15 minutes. Once the coating is firm, your Pumpkin Oreo Balls are ready to be enjoyed! Store them in an airtight container in the refrigerator.
Conclusion:
You’ve reached the end of our delightful journey into crafting these amazing Pumpkin Oreo Balls! I truly hope you’re as excited to make them as I am to eat them. These no-bake treats are a fantastic way to capture the cozy, autumnal flavors of pumpkin and the irresistible crunch of Oreos. They’re incredibly simple to whip up, making them perfect for last-minute gatherings, a fun family baking project, or simply a personal indulgence. The combination of creamy pumpkin, sweet cream cheese, and chocolatey Oreo is a match made in dessert heaven.
I love serving these Pumpkin Oreo Balls at parties, potlucks, or just as an afternoon pick-me-up with a warm cup of cider or coffee. They also make a wonderfully thoughtful homemade gift for friends and neighbors during the fall season. Don’t be afraid to get creative with variations! Consider adding a pinch of nutmeg or cinnamon to the mixture for an extra spice kick, or try rolling them in crushed graham crackers or chopped pecans for added texture. You could even drizzle them with melted white chocolate for an elegant touch. I highly encourage you to give these Pumpkin Oreo Balls a try – I’m confident you’ll fall in love with them!
Frequently Asked Questions:
Q: Can I make these Pumpkin Oreo Balls ahead of time?
Absolutely! Pumpkin Oreo Balls are perfect for making in advance. You can store them in an airtight container in the refrigerator for up to a week. This makes them ideal for preparing for holiday parties or get-togethers well in advance.
Q: What’s the best way to store leftover Pumpkin Oreo Balls?
To keep your delicious Pumpkin Oreo Balls fresh, store them in an airtight container in the refrigerator. They’ll maintain their wonderful texture and flavor for several days. If they’re particularly warm where you are, refrigeration is definitely the way to go to prevent them from getting too soft.
Q: My mixture seems too dry. What can I do?
If your mixture feels too dry and crumbly, it might be due to the type of Oreos you used or the moisture content of your pumpkin puree. You can add a tablespoon of pumpkin puree or a teaspoon of milk at a time until the mixture comes together and is easily formable. Be careful not to add too much liquid, or they’ll become too sticky.
Pumpkin Oreo Balls
Delicious no-bake treats made with crushed Oreos, cream cheese, and dipped in festive orange candy melts.
Ingredients
-
36 Oreo cookies
-
8 oz cream cheese, softened
-
12 oz orange candy melts
-
1/2 teaspoon pumpkin pie spice
-
1/4 teaspoon ground cinnamon
-
1/4 teaspoon vanilla extract
Instructions
-
Step 1
Crush the Oreo cookies into fine crumbs using a food processor or by placing them in a plastic bag and crushing with a rolling pin. -
Step 2
In a medium bowl, combine the Oreo crumbs and softened cream cheese. Mix until well combined and a dough forms. -
Step 3
Stir in the pumpkin pie spice, ground cinnamon, and vanilla extract. Mix until evenly distributed. -
Step 4
Roll the mixture into small balls, about 1 inch in diameter. Place the balls on a parchment-lined baking sheet. -
Step 5
Melt the orange candy melts according to package directions. This can be done in the microwave in short intervals or in a double boiler. -
Step 6
Dip each Oreo ball into the melted candy melts, ensuring it’s fully coated. You can use a fork or a toothpick to help with dipping. -
Step 7
Place the coated Oreo balls back onto the parchment-lined baking sheet. Let them set at room temperature or in the refrigerator until the candy melts are firm.
Important Information
Nutrition Facts (Per Serving)
It is important to consider this information as approximate and not to use it as definitive health advice.
Allergy Information
Please check ingredients for potential allergens and consult a health professional if in doubt.